Businesses are giving a tough competition to each other in the current online space. Every business owner wants to stand high in the market. Therefore, PSD to HTML CSS Conversion becomes an effective approach towards it. This conversion helps in optimizing your business site and improving its performance to get a rich online presence over the web.
However, many business owners get into this dilemma when it is about to choose best design tool to convert PSD to HTML for building a responsive site. At onlypsd2html, after researching a lot, we have drawn some useful points that elaborate how can you convert PSD to HTML CSS using Dreamweaver, the best design tool to create amazing websites.
Why choose Dreamweaver for PSD to HTML CSS Conversion?
Dreamweaver is an Adobe product which provides useful tools for those who prefer to write code through a window that displays both code and design views. Other useful features include the file manager, code validation, and accessibility checks. Dreamweaver’s main functionality focuses on creating HTML & CSS whilst also managing your files.
“Dreamweaver CC comes with a modern interface and a fast, flexible coding engine to give web designers and front-end developers easier ways to create, code, and manage websites that look amazing on any size screen.”
This blog will show you how you can convert your PSD layout into a website by using slice and coding technique in Dreamweaver. Let’s check out the two conversion methodologies to convert PSD to HTML CSS using Dreamweaver:
FIRST METHODOLOGY: Flexi CSS Layouts
Flexi CSS Layouts is a Dreamweaver Extension that helps you create browser compliant table-less web pages with an ease. Flexi CSS Layouts for Dreamweaver also helps you in building your own custom layout structure without coding which is not possible with templated CSS layouts(1, 2 or 3 columns).
PSD design, Flexi CSS Dreamweaver extension, Adobe Dreamweaver CS3, CS4 or CS5 are the main requirements to accomplish this task. You can easily create fixed, liquid or elastic layouts in seconds and can generate custom website sections with unlimited DIV levels, following even the most detailed mock-ups from your designer.

Have a look at the step by step procedure of PSD to HTML CSS Conversion:
– Know the Layout Structure:
It is the very first step which makes you understand how to build the page structure that holds the elements from the PSD layout. First plan the generic page elements viz. the header, the main content and the footer. However, you might need other elements such as menus, sidebars with ads, text, images, facebook ads etc. For each element you use on the layout, a cell(divs) should be created from the interface which is as easy as working with tables.
– Use Flexi CSS Layouts Dreamweaver Extension:
Now, Download and install the Flexi CSS Layouts extension in Dreamweaver. After opening the archive, you can double click the .mxp file and your Adobe Extension Manager should open and install it automatically or you can extract the archive, open your Adobe Extension Manager and select install. Then search the folder where you extracted the .mxp file and click open.
After you done these steps, open Dreamweaver, go to the Insert Panel, find the Flexi CSS Layouts tab and press Insert Full Page Layout.
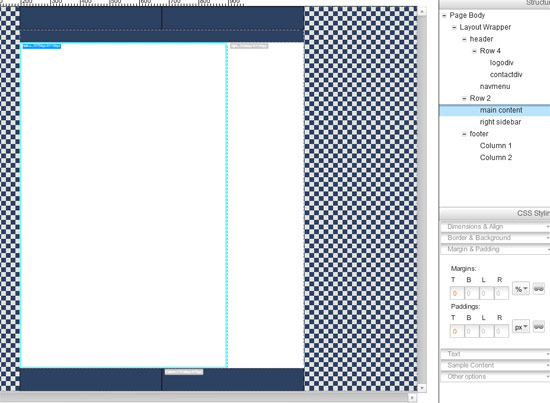
– Create the main Layout structure:
Here you must see a popup window where you need to set up the main properties of the layout such as center alignment, background color. For CSS, set the CSS rules to be written into an external CSS file. You will get multiple pop-ups for the header, content and footer rows where you need to set the height of these rows, padding, width of the columns etc. as per your project’s requirements.
For building a flash drop down menu, I suggest you use Dreamweaver menu extensions. However, you can test your own ideas for your navigation menu.
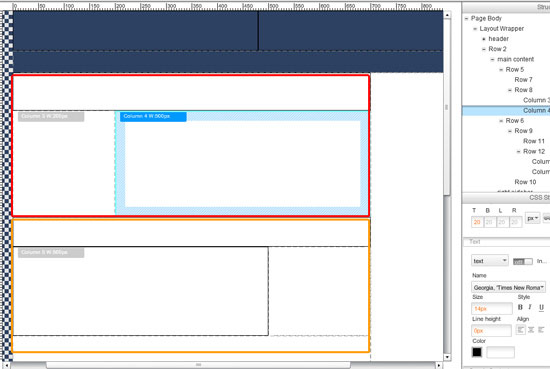
– Create a layout for content:
For this, you need to make the columns for the text and make cells for the images. You can even create a section for each content piece called as “section layout”. It all depends on your project need how to split the main content into rows. It would be like if you add one row at the time, just split the main content into 2 rows.
– Use Page Section Layout for details:
The page section layouts can be inserted into full page layouts because you mainly focus on the details instead of the main layout. The section layouts can be inserted in any cell created in the main layout.
SECOND METHODOLOGY: Extract CSS layouts
Dreamweaver has a complete integration of Extract which helps businesses to easily go from PSD to HTML CSS using Dreamweaver. Extract enables web designers and developers to build the web and mobile content from a PSD to HTML CSS using Dreamweaver. It bridges the gap between Photoshop and Dreamweaver.

With the help of Extract panel, you can easily extract images, fonts, CSS, gradients etc. which help build websites faster. You can even launch the Dreamweaver CC if the panel is not opened by default.
“Dreamweaver CC has a modern UI, CSS Designer, edit capabilities in Live View and a 64-bit architecture. That’s not all though, it gets even better. It also has a complete integration of Extract which empowers users to easily go from PSD to HTML CSS using Dreamweaver.”
Have a look at the step by step procedure of PSD to HTML CSS Conversion:
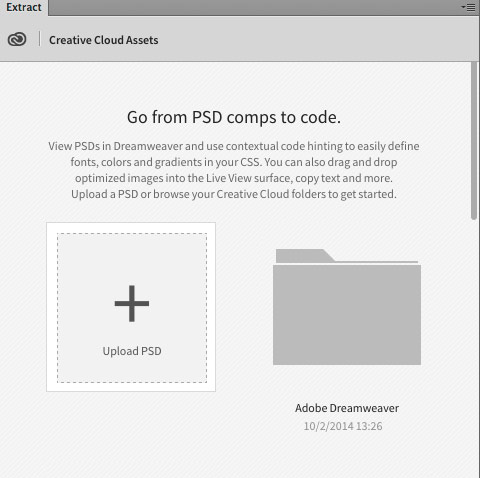
– View PSD in Dreamweaver:
When you click “Get Started” button in the extract panel, it will automatically sync to your Creative Cloud folders and then you can easily upload and view your PSD in Dreamweaver.
– Extract CSS:
When a PSD is opened in the Extract panel, you can fully inspect the CSS that is pulled from Photoshop layers. When you select a layer, youll see all the CSS associated with that selection.
– Extract image:
Now, the PSD to HTML conversion experts can extract web-optimized images into their designs, all without leaving Dreamweaver. After this, it will prompt another dialog where you can set the folder location, name the image and change the image format.
– Use Layer tab:
With the help of layer tab, web developers can easily view the PSD structure and layers in one place. It actually enables them to view PSD layers, toggle eye icon and can download multiple layers.
– Use Styles tab:
Using the style tab, web developers can easily copy, inspect and extract font styles, colors, sizes and much more.
Both of the above methods can help you easily convert PSD to HTML using Dreamweaver. Flexi CSS Layouts is applied when you are working with Adobe Dreamweaver CS3, CS4 or CS5 while Extract CSS layout works with Dreamweaver CC.
When you convert PSD to HTML CSS using Dreamweaver, you become able to attract more organic traffic to your website. In fact, your website becomes more recognized and more people will automatically land on your website. This also improves your website rankings. So outsourcing PSD to HTML conversion services is a cost efficient way of getting a dynamic website which yields high profits.
At onlypsd2html, we have a large team of PSD to HTML conversion experts who are adept at both the above methodologies. If you are looking to hire PSD to HTML conversion experts then we can provide the same.